Background
1840s: Moorse code over telegraphs using copper wire.
1950s: Computers used to convert digital data to analog audio signals to transmit over copper telephone wire. Conventions specified as RS-232. ASCII becomes standard format to digitally express alphanumeric symbols.
1983: TCP/IP becomes official protocol of ARPANET.
2010s: Inexpensive microprocessor used to adapt serial data from RS-232 over to TCP/IP: WiModem232
Shown below is an example of what a single byte looks like using the RS-232 specified conventions (with a start bit, 8 data bits, and a stop bit). This specific signal was generated from the Deluxe RS232 Pak off a Tandy CoCo3.


Description of the above: The signal starts at -12v because the idle state is “1” and RS-232 levels are inverted. So, a “1” is -12v and a “0” is +12v. Idle state is a “1” and the first bit you see is when the voltage goes HI. That is a “0” and it’s the start bit. Then you see the data byte, LSB first, represented as “0-1-0-1-1-0-1-0” followed by the stop bit which is a “1”. If you reverse the order to put MSB on the left (which is the how we represent it when we write it in binary) you get 0101 1010 (that is hex 5A or ASCII “Z”).
There are two ways for a computer to conduct RS-232 serial communication: “bit-bang IO” and “asynchronous serial IO.” The difference is “who” is doing the encoding of the digital data: the host processor in-line with all of its other processing (“bit-bang” approach), or a kind of “hardware accelerated” assistant whose is delegated to do this encoding in parallel (“asynchronously” which is generally far more efficient and faster but requires special programming).
Once connected to your wireless router, the WiModem232 can then use IP-addresses like they were phone numbers. You can “dial” BBS or Telnet servers, or you can also connect to any other system accepting a socket connection (the terminal software ZOC has an “Accept Connection” option exactly for this purpose).
To see a demo of this across a Local Area Network (LAN), see here.


Serial I/O, using the ASCII standard, is still used today to load “firmware” into embedded devices (at rates well over 200,000 baud). The WiModem232 doesn’t translate into audible signals (as legacyl MoDems used to do), but instead translates to/from TCP/IP packet. Vintage (pre-1980s) systems and terminal software remain “tuned” to operate at the legacy rates of 300-9600 baud. The speed to use is a combination of the CPU processing speed (1-4MHz) and the depth of IO buffers available.
I’ve successfully used the same WiModem232 device with:
- Commodore PET 4016
- Commodore 64
- Tandy Color Computer 1 and 3
- IBM PC 5150
There are multiple versions of WiModem232-like devices, but I found the one from CBMSTUFF.COM to be reliable, well packaged, and well supported.
For the IBM PC notes on setting up a WiModem232, see here.
Typical sequence of commands
The list of available WiModem232 commands is here. A summary is listed below, in the order one would usually use these:
AT                 ; ATtention
AT                 ; repeat just to ensure modem is "awake"
AT*B9600           ; set baud rate; typical speeds are 300, 600, 1200, 2400,
                   ; 4800, 9600, 14400, 38400, 57600, 115200, 230400
ATE0               ; turn off echo (ATE1 to turn on), may depend on duplex
AT&C0              ; set carrier detect to always (different than ATC0)
                   ; maybe necessary only if using 3-wire setup
ATI                ; information about current WiFi connection
AT*N               ; list of WiFi networks
AT*NS1,<password>  ; connect/select SSID #1 in list with given password
AT*L<port>         ; set incoming port
AT*P<port>         ; set outgoing port
AT*T1              ; enable TELNET translation mode (0 for BBS)

AT&W               ; write/save settings
ATDT <ip>:<port>   ; call the specified IP and port

+++                ; change from terminal to command mode
ATO                ; letter O ("oh"), not zero (resume terminal)
ATH0               ; hangup
AT*REBOOT          ; restart the WiModem232
Tandy Color Computer Setup
Way back between 1980-1982, Tandy offered a Modem I (1981) and Modem II (1982) device. They supported both RS-232-C DB25 connector (for older TRS-80 models) and a 4-pin DIN to 4-pin DIN connector (for CoCo series — notice the “FORCE DTR” switch option). The modern WiModem232 is a substitute for these modem devices.


There are two options for using a WiModem232 with the Color Computer (CoCo).
OPTION 1: Using the built in SERIAL IO Port (typically 4-pin DIN to 9-pin Female) [bit-bang]
The Color Computer (CoCo) features a Serial I/O port as a standard part of the system. This was typically used for a serial-printer sold by Tandy that didn’t need a lot of speed. But the port could also be used by very early modem. This is a slower option, since to use this port the terminal software must run inline with executing the serial connection protocol (of listening for START/STOP bits and packaging together a full data byte). That is, it is a brute force bit-bang approach.
To use the built in SERIAL IO of the CoCo, there are several options:
- Option A: Acquire (or build) the original SERIAL IO cable, which is 4-pin DIN to DB9 9-pin connector. These are difficult to find these days, since the 4-pin DIN is a peculiar type of connector that is increasingly harder to find. Note, the cable will only actually have 3-wires connected inside. See notes here on how to modify the DB9 side to make it work.
- Option B: Refer to notes here. Fundamentally, the CoCo Serial IO port is only 4-pins. Which means through all the adapters up to the 25-pin input of the WiModem232, only up 4 of those pins are actually being used. With that in mind, you can run those 4-wires yourself. But using proper adapters can make the experience more reliable and safer.
- Option C: Use a DriveWire cable (see here). In addition to the cable, DriveWire is a more modern piece of software that enables many features of the CoCo to be exercised remotely (such as from a PC), but it works by communicating over a modified serial cable. You can make a SERIAL IO cable into a DriveWire cable by using a NULL MODEM adapter (that inverts the TX/RX wires). Conversely, you can make a DriveWire cable into a standard SERIAL IO cable also by using a NULL MODEM adapter (search “DB9 null modem male to female slimline data transfer serial port adapter 2 Pack”).
In either case, you will also need a DB9 male to DB25 male adapter to connect either type of cable to the WiModem232. There is an example of the setup using a DriveWire cable with an in-lined null-modem inverter.


A cable is just “metal on metal” contacts, so one could jury-rig their own solution.

OPTION 2: Using RS-232 hardware on the Expansion Port

Tandy produced a Deluxe RS232 Pak for the Tandy CoCo systems in 1983 (see here), which can be viewed as a sort of “hardware accelerated Serial IO port.” This uses a MOS 6551 chip, which helps offload the main CPU so that the serial communication can be conducted in parallel with the main CPU processing. An original Deluxe RS232 Pak hardware is difficult to find, but an authentic pin-compatible functional and ROM equivalent remake is also available.
- http://members.iinet.net.au/~ianmav/trs80/
- https://archive.org/details/Deluxe_RS-232_Program_Pak_Operation_Manual_1983_Tandy_a
- http://www.colorcomputer.net/downloads/deluxe_wireless_rs232_pak_manual.pdf
The Deluxe RS232 Pak really is like a proper Serial Port being added to the CoCo. But there are a couple reasons not to use it:
- Don’t have one (see notes above, as they can be hard to find)
- Don’t have an MPI (multi-pak interface): The only way to make real use of the RS232 Pak is to have proper “terminal” software. And you can’t connect the disk and RS232 Pak at the same time (without a multi-pak). The RS232 Pak does come with its own built-in terminal program on a ROM, but it is mostly for testing/checkout as it has very limited capability.
- Don’t have a proper cable: You need a DB25 male to DB25 male cable or “gender changer” to connect the RS232 Pak to the WiModem232. If you can’t find these, you could make your own adapter with just a few wires (3-4 wires minimum, not all 25 wires are needed).
When inserting the Deluxe RS232 Pak, remember the “component side” goes upwards (if inserting to the expansion port on the right side of the CoCo). If using a multi-pak, the “component side” goes towards the CoCo itself. The built-in terminal software is invoked (executed) by one of the following addresses depending on which CoCo system you have (these should be on labels on the RS232 Pak, but provided in case the label is missing):
- Color Computer 1 & 2: EXEC&HC000
- Color Computer 3: EXEC&HE010
What is a Terminal Program?
A “terminal program” is software that knows how to communicate with the RS232 port (or provides a “bit-bang” alternative on some available external IO pins). A modem connected to the RS232 port may know how to intercept and respond to certain sequences of commands (like “ATDT” to dial). The terminal software manages how received data is presented on your local display (scrolling the screen, word wrap, interpreting terminal commands like CLEAR or MOVE CURSOR or CHANGE COLOR).
There is no singular terminal program, they all have different features (and more features requires more RAM). A terminal program must be at least somewhat aware of the capabilities of your local system, provide settings for how fast to communicate, provide settings for which “terminal emulation” to support (e.g. VT-100, ANSI), and maintain the connection. More advanced “terminal programs” have features like recording your session to a file, upload/download file protocols, and a “phone book” database of commonly used connections.
The Deluxe RS232 Pak has a basic built-in terminal. It is enough for testing the modem and doing a basic check out of functions, and is always available (stored in ROM) so that it can work for any CoCo model. But more advanced terminals provide many more features.
The WiModem232 by default should be setup to 300 baud. If you received a used WiModem232, it is possible that its stored settings might not be compatible with your system. The OLED display will show the baud rate that the WiModem is set at (unless it is cracked! the WiModem itself can still function even if the OLED is cracked). Just try multiple baud options until it works, but the point is: it’s possible the set speed of the WiModem232 might be too high for your system (and so it is “stuck” unless you use a more capable system to re-adjust the settings). In that case, you’ll need to find a way to reset the WiModem232 back to default settings (if the WiModem232 is in an enclosure, you’ll need to disassemble that). The WiModem232 manual describes a way to do this (touching contact between two pads at the back during power up).
Terminal Program Setup
Regardless of what Terminal Program is being used, they all have a Settings mode, to define a few basic settings of how to interact with the modem. Each terminal program tends to have a different way of specifying these settings. Typically, in modern Serial Connections, we just worry about the Baud Rate. Modern connections (i.e. after 1980) are so reliable, we don’t worry about Parity, just use a single stop-bit, and everyone works in 8-bit “chunks” of data. “8-N-1” Except for some very old and esoteric systems (including some “serial plotters” or “serial printers”), 8N1 is what everyone uses. So mostly we just need to mess with baud rate.
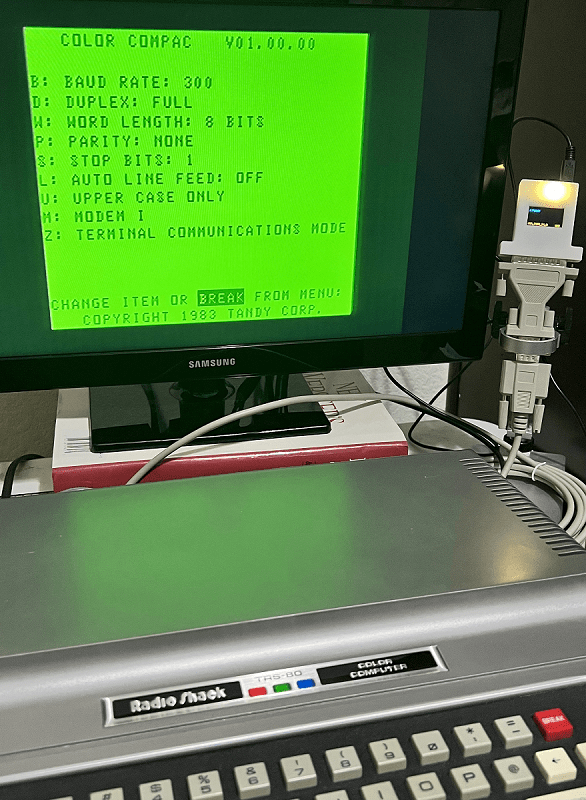
SETTINGS (typical for the built-in RS232 Pak software)
B: BAUD RATE: 300
D: DUPLEX: FULL (instead of HALF)
W: WORD LENGTH: 8 BITS
P: PARITY: NONE
S: STOP BITS: 1
L: AUTO LINE FEED: OFF (instead of ON)
U: UPPER AND LOWER CASE (instead of Upper only)
M: MODEM I (I am not sure what MODEM II does)
Z: TERMINAL COMMUNICATIONS MODE
Once satisfied with the settings, press “BREAK” to enter the terminal mode. If the WiModem232 and Deluxe RS232 Pak are all connected properly, you should be able to type “AT” and see an “OK” response from the device. Sometimes you may need to type “AT“(ENTER) and then “AT“(ENTER) again (i.e. type it two times to “wake up” the modem).
If you see “AATT” while typing, do not be concerned, this means local echo is on. You can address by changing the DUPLEX from HALF to FULL. Or, issue the command “ATE0″(ENTER) to turn off local echo. Again, type “AT“(ENTER) a couple times to verify the local echo goes away.
Always remember, if you power cycle the CoCo, the WiModem232 will retain its settings (until you power cycle the WiModem232 itself). That is, they are independent systems with their own settings.
Now type “ATI” to see the WiModem232 configuration. The CoCo only has 32 columns and 16 rows, and new lines may end up doubled. If this happens, press BREAK to go back to the menu, and make sure “AUTO LINE FEED” is set to OFF.
The ATI command shows all the pertinent details about the WiModem232:
FIRMWARE version
BAUD: current baud rate,8N1 (word, parity, stop)
OUTGOING PORT: 1541
INCOMING PORT: 6400
SSID: <your current WIFI connection>
MAC: <mac address of your particular WiModem232>
IP: <local network IP>
WIFI Channel and FCC ID.
For all commands available to the WiModem232, refer to the manual here.
The first main command will be “AT*N” to list the available networks. Followed by “AT*SSID <name>,<password>“. Alternatively, if the SSID has a name that is difficult to type, you can connect using the index number shown during the AT*N command, by using “AT*NS1,<password>” If your local terminal doesn’t support lower case characters, you may not be able to enter the password.
Next, you probably want to increase the baud rate. 300 baud is painfully slow, you can almost type faster than that. But remember, if you set baud rate too high (higher than what your terminal software or system actually supports), you’ll need to power cycle the WiModem232 itself to revert back to the 300 baud default. Except note it is also possible to STORE the baud rate permanently, so you don’t have to reset it each time during power up.
“AT*B<rate>” to increase the baud rate. The fastest baud rate you can use depends on several factors: the MHz (speed) of your local CPU, the overhead/efficiency of your terminal software, and the modem you are using. The WiModem232 itself is capable of up to 230400 baud (the WiModem232 can be used on modern PCs just as well as old ones!). Some systems may support 4800 or 9600 baud, but then struggle once actual communication starts to happen. So, there is a kind of hardware limitation and a software limitation. After issuing the AT*B command, press BREAK to go back to the terminal and adjust the baud setting to match.
Almost all 8-bit systems from the 1970s onward will comfortably support at least 1200 baud.
“AT&C<x>” is another important command. Depending on your cable or setup, you may need to force this ON or OFF. And you may need to do this with a cable or setup that “works” (which might be the slower SERIAL IO), before then using the Deluxe RS232 Pak. NOTE: AT&Cx (DCD setting) is different than AT*Cx (CTS setting). For me, I used AT&C0 (off) and AT*W (write that).
The GETerm manual documentation mentions this:
” R S 2 3 2 P A K W a r n i n g
The RS232 Pak always expects carrier to be present (from the
modem) before anything will be sent from it. Thus, most of you
should have a switch on your modems to make the carrier always
“high”; in other words, make the carrier signal always be
present. This is needed for the RS 232 pak to operate
correctly. If you wish to use Greg-E-Term to dial with a smart
modem (ie. using “ATDT”), you MUST have the carrier high before
you can send anything through the RS232 pak (such as the phone
number you wish to dial.)
If you do not have such a switch, you must first manually call
the BBS or network with a phone, and receive a carrier before
anything you type in the Communication Mode will be sent to the
RS232 pak. “
Long story short, issuing AT&C0 and AT&W (save setting) may be necessary when using the Deluxe RS232 Pak.
“AT*UPDATE” to update the firmware, if/when ATI says “NEW FIRMWARE AVAILABLE”
“AT&W” to write settings.
“AT*P<port>” to change the OUTGOING port. (1541 default)
“AT*L<port>” to change the INCOMING port. (6400 default)
At first, ATDT was not working for me (across the LAN). Then I realized that the default WiFi SSD (that I typically use for guest) has a setting that prevents it from scanning the rest of my network (which is why I use it for guest). So, I used “ATI” and reconnected the WiModem232 to a different SSID that I use for internal wireless devices.
COMPAC: 1983, supports 300 or 1200 baud. Works on CoCo1 (load via WAV file).
GETERM11: 1986, supports up to 1200 baud and VIDEOTEX
GETERM25: 1988, supports up to 9600 baud and VT-52
Example of Terminal Programs for Color computer

Notes for the Commodore PET
PETTERMxxx.PRG is a terminal program written in “modern times” and its source is available on github here. There is a “releases” link on the right side of their github notes, prebuilt for 80-col, 40-col, and either Business (B) or Graphic (G) keyboard variants of the PET. Mine is 40G, hence PETTERM40G.PRG being used.
It is small enough to be loadable from tape (8K), but the SD2PET is a very nice modern accessory to load programs from files. To enable changing directories, a “WEDGE” program is loaded first:
LOAD “WEDGE”,8
RUN
@CD:<folder>
LOAD “petterm40g.prg”,8
RUN
(The “,8” indicates first disk drive)
Once PETTERM is loaded, there isn’t much to it — set your baud rate, then press ENTER and proceed with your terminal commands. You can return to the menu using the CLR/HOME key. PETTERM is able to operate at 2400 baud, which is amazing for a 1MHz pre-1980s system.
The WiModem used on the PET is exactly the same as used on the C64, which connects on the UserPort. However, an extra “power cable” is needed on the WiModem when used for the PET. When ordering, you can request for this cable to be wired in, then use the 2nd cassette port as a 5v power source (the 2nd pin in from the top left).

