GOTO PART 6 (References)
PART 5 ended up being rather long. To help categorize the content, here are the major topics that may help to search and find a specific topic of interest:
- Finding the Cable
- What Software Supports Cassette SAVE/LOAD
- CCR EAR/AUX/REM/MIC Connection (how to set the cables)
- PC/Laptop Connection (using traditional headphone/microphone jacks)
- USING A SMARTPHONE / TABLET
- RECORDING AUDIO FILE BACK TO TAPE
PART 5: Example Usage of Cassette and Smartphone/Tablet
The intent of this section is to demonstrate how a CTR (cassette tape recorder) is used with one of these Tandy computer devices. Specifically, I show usage with a Tandy Color Computer 1 (16KB version), but the physical setup is essentially the same for all the PCs that use these devices.
Finding the Cable
I haven’t found any shop that still makes these cables or has a supply in stock. They were never quite an “industry standard” type cable (like VGA, HDMI, S-video, CAT-5, etc.), and were a niche cable to the “Tandy ecosystem.” They don’t even have a standard name. For example, I have the original CCR-82 box, which has no mention of the cable (on the box), such as “Connector Cable Included” (which this cable was included with all the CTR/CCR devices). The “5-pin DIN” side of the cable was very much a (European) standard. But what the pins connected to (e.g. audio plugs in this case) was up to the end-user (or in this case, up to Tandy).
This means finding a suitable cable can be a challenge. It is NOT the same cable as the MSX-systems (e.g. Sony HB-75B, Toshiba HX-10), those used 8-pin DIN and not 5-pin. And again, the Tandy CTR/CCR original boxes did come with this cable – if you see a used CTR/CCR model for sale, but without the cable, then its matching cable has been lost over time.
Sometimes this cable can be found on eBay, but without a standard name to search for it can be tedious to find on its own. Try “TRS-80 cassette cable” or “Dragon cassette cable” (yes that same cable will work for CoCo, Model 1/3/4, and IBM 5150). One retailer I can suggest is: Cool-Novelties | eBay Stores (contact them and they can probably make a cable for you, but they are in the UK and shipping might cost more or take longer).
Two links for instructions on how to construct the necessary 5-pin DIN cable for TRS-80 systems…
- Hardware – Cassette | Ira Goldklang’s TRS-80 Revived Site
- Build your own Data Cassette Cable for your TRS-80 – 8bit Micro.com – Online Vintage Computer Magazine (8bit-micro.com)
What Software Supports Cassette SAVE/LOAD
The following software supports SAVE and LOAD operations…
- The built-in BASIC ROM of the Tandy machines (CoCo1/2/3, Model 100 series)
- The built-in BASIC ROM of IBM PC 5150
- Dungeons of Daggorath (ZSAVE/ZLOAD)
- Orchestra-90 CC Stereo Music Synthesizer (WRITE/READ)
- Color Computer: Spectaculator, Bedlam, Pyramid 2000, Madness and the Minotaur, Keys of the Wizard, various Scott Adams Adventure titles, saved files from Art Gallery and Micro Painter
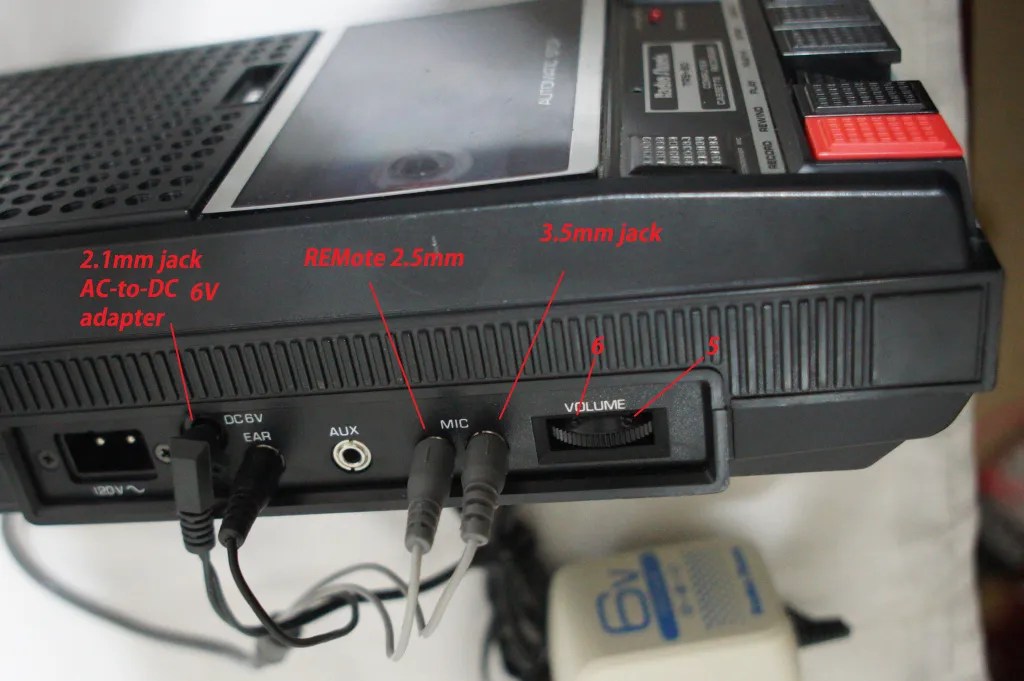
CCR EAR/AUX/REM/MIC Connection
EAR = Earphone/headphone (output speaker)
AUX = Auxilliary (like a background audio to be recorded during a dictation/interview)
REM = Remote (signal to control when motor turns, even if PLAY button is pressed)
MIC = Microphone (input recording)
For data recording purposes, often either AUX or MIC ports can be used. But some trial and error may be needed, as these ports might have slightly different levels of sensitivity (by their associated internal circuit components or just the natural age of the metals in the port).
Here are images (below) of how the cables are connected. I have both the original Tandy cable and an “aftermarket” constructed cable. They both work fine with original tape cassette equipment.
The audio plugs of the cable (typically) aren’t labeled, For the Tandy original cable, the “off-color” cable (black) is “EAR” (headphone) and the “two-matching-colored” cables (gray) are REM (smaller 2.5mm jack) and AUX/MIC (3.5mm jack). Custom build cables should follow this same convention, but not all of them do. If uncertain, an alternative is to just use trial and error – using the wrong plug won’t harm the PC or the device, and there are only two choices to try.
Trial and error is just turning on the machine, typing a simple BASIC program (below), and try to SAVE and LOAD it back. If it fails, then try swapping the EAR and MIC cables.
10 ?”HELLO”CSAVE
NOTE: The original TRS-80 and CTR-41 manual indicate to use the AUX jack (for TRS-80 Model 1), but for my use on the IBM PC 5150 and CoCo1, I’ve always used the MIC jack. The IBM PC 5150 has a jumper near the front disk drives (on its motherboard) to indicate AUX vs MIC usage.

PC/Laptop Connection (using traditional headphone/microphone jacks)
Using a “modified” TRS-80 cassette cable (that has stereo plugs for the AUX/MIC connector), I was able to use a laptop as a cassette recorder (see cable images above for visual difference). Modern PCs tend to come with a built-in microphone (sometimes more than one), so those internal ones need to be disabled. The 3.5mm microphone jack should be the only enabled audio input source. Then in addition, both the microphone and speaker “level” (volume) should be reduced from max to about 70.
The modern PC will be digitally encoding the analog audio during both recording and playback – so the precision of that encoding will be very important. That precision is in “Hz” (or samples per second). I don’t know which Hz is “good enough” for recording cassette-data tapes – for example, CD-quality is generally 44.1KHz. As a “just in case” provision, I set the microphone and speaker to the highest “Studio Quality” the hardware supports (in my case, 192KHz). This will make the resulting data files much larger, but should ensure SAVE and LOAD operations work across all scenarios (i.e. some data may be easier than others to encode, which means a lower setting may work in some conditions and not others).
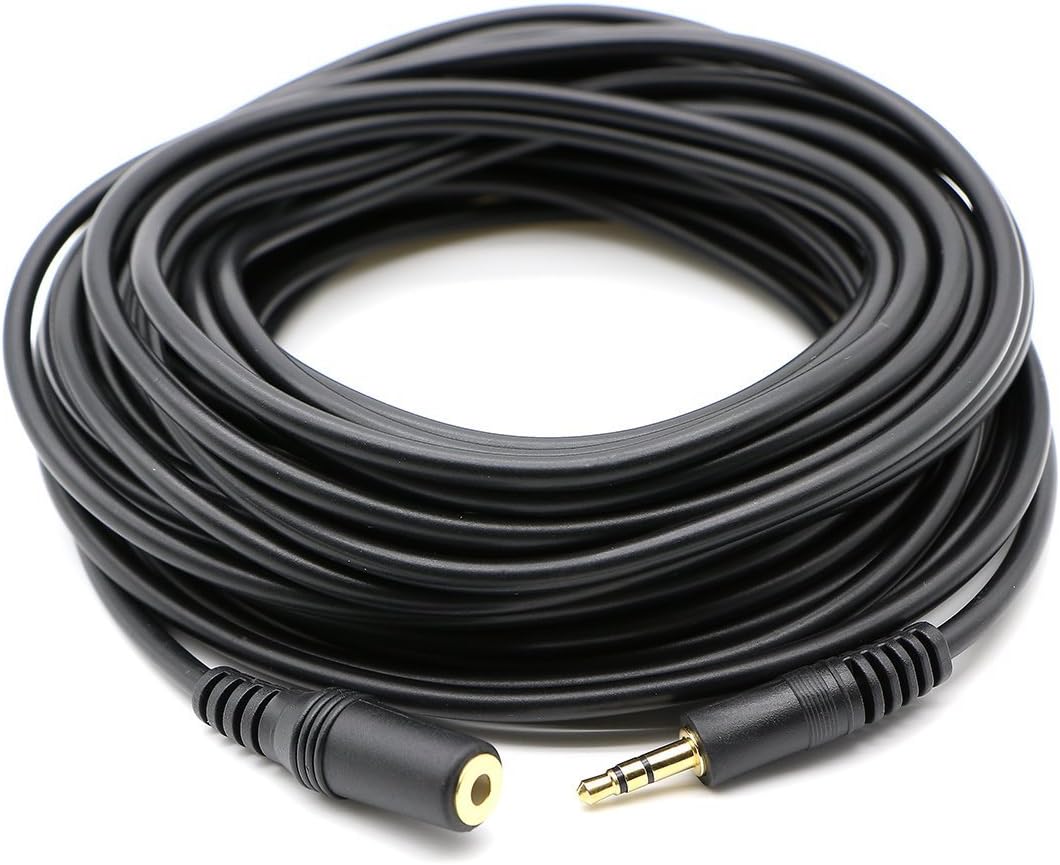
How to apply these settings will vary by Operating System and hardware drivers being used. In the example below, I used Windows 10 and the built-in audio hardware of a DELL Latitude laptop. You could use a desktop PC as well, but might need audio cable extensions (sometimes called “headphone extensions”) since the typical Tandy cassette cable is under two-foot length. I don’t really recommend this (and encourage using a laptop instead), because audio extension cables can introduce intermittent signal-loss (the rotation/orientation of the connector can make a difference, just depends on the quality of the cable). This type of audio extension cable looks like the following (and you would need two of them, for the REC and AUX/MIC cables):
NOTE: Modern PCs won’t support the REMote plug, so you have to manually handle when to PLAY and RECORD (more about that is described in sections further below).
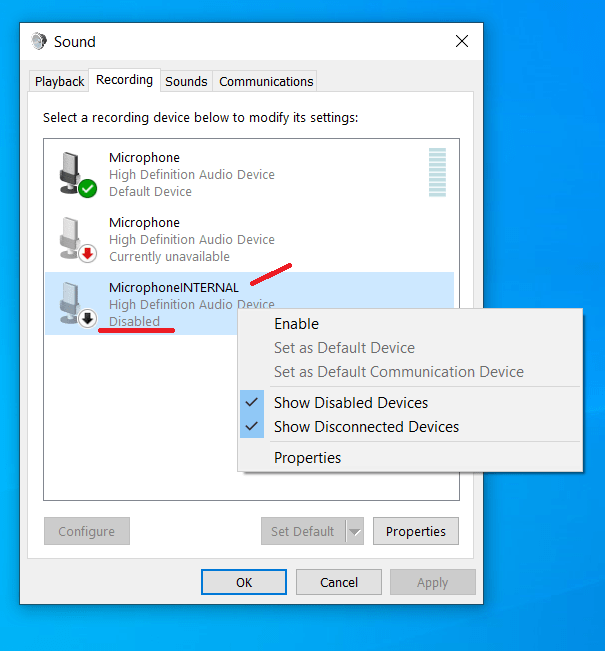
Typically for Windows, if you right-click the Speaker icon on the taskbar, you have a “Sounds” option. In the settings dialog that opens, you’ll need to adjust settings under both “Playback” and “Recording” tabs…
NOTE: I use a “regular” phone/audio jack. It may be possible to apply these same settings with a USB connected device (such as modern headset) but I haven’t yet personally verified that configuration – the steps should be essentially be the same, but device names will be different.
RECORDER SETTINGS
- Identify and rename the “internal” microphone of the device. This is just to ensure the correct one is being disabled. I did this by trial-and-error: disable all of them, then enable one at a time – do a voice recording, if that recording succeeds then that entry needs to be disabled. Also, you can rename Windows devices – so once I find which one is the internal microphone, I appended “INTERNAL” to its name.
- On the remaining (one) enabled Microphone entry, right-click and choose Properties
- On the General tab, there should be some reference to an audio jack being used (this is just a confirmation that the right entry is being used, no actual change in setting is needed)
- On the Listen tab, ensure that “Listen” is turned off
- On the Levels tab, set the microphone down to 70 (and set boost to 0)
- On the Advanced tab, pick a Studio Quality higher than DVD


PLAYBACK SETTINGS
- Similar to microphone, modern PCs may have multiple speakers or audio outputs. We just need to check settings on whichever one corresponds to the 3.5mm jack.
- See Properties of the Speaker (right-click, select Properties from sub-menu)
- On the General tab, check that the jack information is related to the 3.5mm jack (just a verification)
- On the Levels tab, reduce from full throttle (100%) down to 60-70 (and avoid adjusting the system volume later, when LOADING/PLAYING cassette data recordings). If this setting is too high or too low, I noticed during a CLOAD the load would abort early and the CoCo would just reset itself.
- On the Enhancements tab, select “Disable all enhancements”
- On the Advanced tab, pick a Studio Quality


With these settings, I was able to SAVE/LOAD data using the Color Computer, in both ROM BASIC and a couple cartridge applications (all with these same settings). I use the regular “Voice Recorder” application that is included with Windows (at least Professional edition, not sure about Standard). But there are some details to be aware of since the REMote plug is not in use here:
- When about to SAVE data, start the recording a second or two before initiating the SAVE. On a CTR/CCR physical recorder, you would press RECORD+PLAY at the same time. With the REMote plug, the recording wouldn’t start until cued from the PC (via the REM plug). Since we don’t have that REM plug in this setup, we have to manually initiate the recording before it starts on the PC side. You can use digital audio editing later to trim empty content from the audio recording, as needed (i.e. the portion before the actual data stream just needs to be a moment, half a second would be fine).
- Then conversely, when you want to LOAD data, do not play the recording until after initiating the LOAD. When you command a LOAD from the Tandy-device (or equivalent), it will “busy-wait” until the start of a valid data stream. If you begin playing the recording too early, the header of the data stream may get skipped. On a CTR/CCR physical recorder, you could leave the PLAY button down, and the device would use a relay to cue when the PLAY should actually proceed (via a signal on the REMote plug). Without the REM plug, this now has to be done manually.
BELOW: Example of using “ZSAVE” in the game Dungeons of Daggorath. Remember, the recording should already be in progress before pressing ENTER on the ZSAVE command. Also shown is using the “modified” Tandy TRS-80 cable (the original cable with all mono-plugs did not work for me). “ZLOAD” was then used to re-load the game-state condition (also verified after a complete power-cycle of the system).


BELOW: Example of using Color Computer built-in ROM BASIC to SAVE and LOAD a simple program (that converts degrees to radians). Again, this is using the “modified” TRS-80 cassette cable (with stereo plugs instead of mono).
10 FOR I=0 TO 360 ' 360 degrees in a circle20 PRINT I; ' print degrees (";" stays on same line)25 PRINT " > "; ' show a conversion "arrow"27 D=I/180 ' divide out 180 "degrees"28 D=D*3.14159265 ' multiply by PI29 PRINT D ' print resulting value (no ";" goes to next line)30 NEXT I ' repeat for all degrees
NOTE: The original version of this program combined lines 27 and 28, but doing so ends up with a rounding error in this ROM BASIC. So this program is the “B-version” (DEG2RADB) that is more accurate.
NOTE: The CLOAD command will load whichever BASIC program is found next, so just play whichever recording file you want to LOAD.


EXAMPLE/INFO about Orchestra-90 CC Stereo Music Synthesizer
The infamous Orchestra-90 cartridge does work fine in this configuration. You can save compositions to cassette or PC/laptop recording, then load them later for additional editing and/or playback.
The only minor note is that the WRITE/READ commands for Ochestra-90 are particular about “filenames.” That is, to READ (load) you must specify the same name used during the WRITE. If you forget the name, or lose notes on what the names were, you can still do a READ “” (blank name) – while that won’t actually load any data, the program will still show the names it comes across while searching (so you can then “discover” what names are available, then rewind and load them with the actual names).
USING A SMARTPHONE / TABLET
Since I was able to SAVE and LOAD data with a laptop PC, then conceptually I should be able to do the same thing with a smartphone (which is essentially a pocket sized PC). You can use an old smartphone, or old tablet that is WiFi-only (no SIM card or cellular access) – the only limitation is that the device must be able to run a sound recording app that can handle up to 96 KHz audio recordings (CD-quality is 44.1 KHz).
For this example, I am using an iPad Mini 4 (released in 2015). At time of writing, that iPad was running iOS 12.1. Unlike the PC laptop scenario described above, for this iPad tablet I am able to get the original TRS 5-din cable with mono plugs to work for both SAVE and LOAD.
CABLE SETUP (with iPad Mini 4)
I had to use BOTH of the following (and had them both connected at the same time).
IMPORTANT UPDATE (Jan. 2022): I’ve found it necessary to connect the 3.5mm headphone jack first and then the Lightning adapter. If you don’t do this, then during LOAD you may have to disconnect the 3.5mm headphone jack to force the “loading audio” through the Lightning connector.
- Movo MC3 3.5mm TRS to TRRS Adapter (for SAVING) HERE
- Apple Lightning to 3.5mm Headphone Jack Adapter (for LOADING) HERE
Other brands may sell a similar style adapter cable. They aren’t a very complicated cable, so I suspect any brand should work – just look for a cable length that works for you. I have a small stand for the iPad and can hide the cables behind there (the cables are shown in the image below just to emphasize how they are connected).


With both adapters connected (at the same time), everything works reliably. But like the PC laptop scenario, you must manually invoke the operations: (a) you start RECORD a moment before initiating a SAVE, and (b) you play an audio a moment after initiating a LOAD.
APP SETTINGS
The basic Voice Recorder App did not work for me (it did not have the necessary fine-tune settings). Instead, I used the following AppStore app:
- Voice Record 7 (free version works fine)


You will need to enable Advanced options during recordings. The main settings we used:
- WAV (PCM) format
- 96,000 Hz Sample Rate (or 96kHz)
- Bit depth 24
- Channels Mono
- During Playback, I set Volume to 74 (40-50 was too low, loading would not work; between 70-80 is probably good)
- During recordings, I left the gain at the default of about 5.2 (use the “Level Check” feature to monitor audio signals in real time)


EXAMPLES
And here are the results, shown below. Static images aren’t as exciting as a video for things like this, but I can confirm that I was able to SAVE and LOAD data for all these applications – consistently and reliably. Remember to rename the audio files to something appropriate for their content (the Voice Record App doesn’t make it obvious on how to do this, but there is a little Pencil Icon for it – the default name is the timestamp of the recording).


SHARING TABLET WAV FILES
On a laptop, the WAV files are “right there” and easy to archive, copy, burn to a CD/DVD, etc. It’s the traditional file system we’ve all been using for decades.
But on a tablet: Apple does make sharing files unnecessarily difficult. Images (photos) are fairly easy to share (just plug into USB and open the DCIM folders), but other documents can be more difficult (e.g. using iTunes and setting up some Sync Folders, all that is very annoying).
UPDATE: For the iPhone 13, Apple has once again made transferring photos to a PC very difficult. I ended up having to use a copy of “CopyTrans Photo” for the PC in order to get a bulk transfer of photos and videos to transfer reliably.
Also, these WAV files will be fairly large, so e-mailing the files to yourself isn’t a practical option (and WAV files don’t often compress very well). I’d avoid converting to other formats (e.g. MP3) – it may work, some of the time, but it’s not a loss-less conversion (so you risk having a file that won’t load anymore). For encoded-data purposes, a high sample rate on these recordings is necessary.
So these modern platforms encourage the use of “the cloud” and large online storage services: dropbox.net, box.net, iCloud, OneDrive, GoogleDrive, etc. The “Voice Record 7” app supports all these, then also two other great features: “Send to FTP Server” and “WiFi Download.” Those familiar with FTP servers will appreciate that feature, but I think it is one file at a time (not a batch). The “WiFi Download” activates a simple web server (on the tablet device itself), which you can then use that to download (or upload) WAV files from another PC on your local network. When activated, the App shows the details on how to use it (what IP, and a login to use).
UPDATE: WHERE IS “WiFi Download”? Sorry I didn’t include a screenshot of this, I had trouble finding this option again myself. If you have to click on an existing audio recording, then scroll down the menu of options available, and both Send to FTP Server and WiFi download should be there.

Here is a sample of what the Apps built-in web-portal looks like when accessed from a desktop PC:

RECORDING AUDIO FILE BACK TO TAPE
If you have a WAV audio recording file of an existing binary content, you may want to record the contents of that file back to a tape (to then share that tape with someone who might not have a spare laptop or tablet).
For this, you’ll need a physical CTR (cassette tape recorder) or stereo deck with a tape drive unit. A modern tape recorder will probably work, but these CTR/CCR from Tandy are also perfect for the task. You don’t use the 5-pin DIN cable for this (remove all its plug connections). Instead, you’ll need to use “regular” audio cable. The cable I used came with speakers I used with an old sound card and had “stereo” (2 rings) on each end. Plug into the iPad (as a “speaker output” that would normally go to headphones) and the AUX (or MIC) jack (port) of the CCR.
IMPORTANT: SET THE VOLUME LEVEL DIAL OF THE CCR TO ABOUT 6-8! The exact setting here may vary depending on the quality of the WRITE head on the unit and condition of the AUX/MIC port.

Rewind and set the tape index as desired. However, do not start at 000! The very beginning of most tapes will be a clear portion. I believe these are a stronger kind of tape, to help the tape from tearing if you hit the ends while Fast Forward or Rewind. Or in any case, they mark the beginning and end of the tape. The actual recordable media is the darker brown portion. Typically, I rewind to 000 and then Fast Forward to about 2-4 (or maybe 10 just to start the data at a nice round number).
BELOW: Clear/white tape is at the very beginning (or end), you cannot write to this portion. FastForward the tape a little to get to the data
BELOW: “clear tape” at very beginning. You can manually roll the tape (with a pencil) or fast forward the tape a little (index 2) until the color changes to the darker material.


Press PLAY+RECORD on the CTR (do this first, to get the recording started). Then press PLAY on the PC (or tablet/device) to play the intended WAV file containing the data-content to be shared. Make sure the PC/device has no other sound playing (such as no pop-up notifications with audio). When the WAV recording is complete, remember to press STOP on the CTR to end recording.
During the recording, the red activity light should illuminate on the CTR. This will vary with intensity of the audio, as it indicates some audio signal is being received. However, be aware that the system does not know the condition of the WRITE head. Meaning, the red LED is indicating input activity, but there is no validation that the data was actually written to tape. If the WRITE head is dirty, or if the volume is not set properly, or if the tape material is cheap or degraded, then the data may not be written correctly. The only way to verify is to attempt to LOAD the content immediately after a SAVE.
There are many other programs that support the cassette save and load feature. I’ll skip the countless programs that were on tape themselves, and focus only on the programs that were on cartridge (which Radio Shack called “Program Paks”) or on floppy disk, that supported cassette operations).
Of the productivity / practical programs, you mentioned Spectaculator, but there were others. Here are the ones that could use the tape drive.
Color SCRIPSIT (a word processor)
Spectaculator (spreadsheet)
Color File (database)
Investment Analysis
Personal Finance
Diagnostic ROM
Editor/Assembler
Later on came Color SCRIPSIT II and Color File II, both of which could still use the cassette drive.
Disk SCRIPSIT could also load from and save to tape.
As for art, Art Gallery and Micro Painter could not only save and load the pictures you made, but also had commercially-produced tapes of art files available; each tape had 12 images for Art Gallery and 12 for Micro Painter. Three image tapes, a Bible scenes tape, and a fantasy scenes (dragon, wizard etc) tape.
The “Music” Program Pak could use the tape drive.
Program Pak games that could save to and load from tape (other than Dungeons of Daggorath) included:
Color Cubes (a Rubik’s cube simulator)
Roman Checkers
There were probably more…
I had SCRIPSIT. By that point I think we had a disk drive, so maybe I just never noticed that it could also save to tape.
I did also have Color Cubes, which came with the keyboard overlay. I don’t think I ever realized you could save your progress.
Same for Roman Checkers, I had borrowed that cartridge, but likewise don’t recall running into the save option. I wish the game Downland had supported this 🙂
I can’t remember if the Daggorath “sequel” Castles of Tharrogad supported tape-saves, then again not many people played that one for more than 5 minutes haha!